
Important Notes:
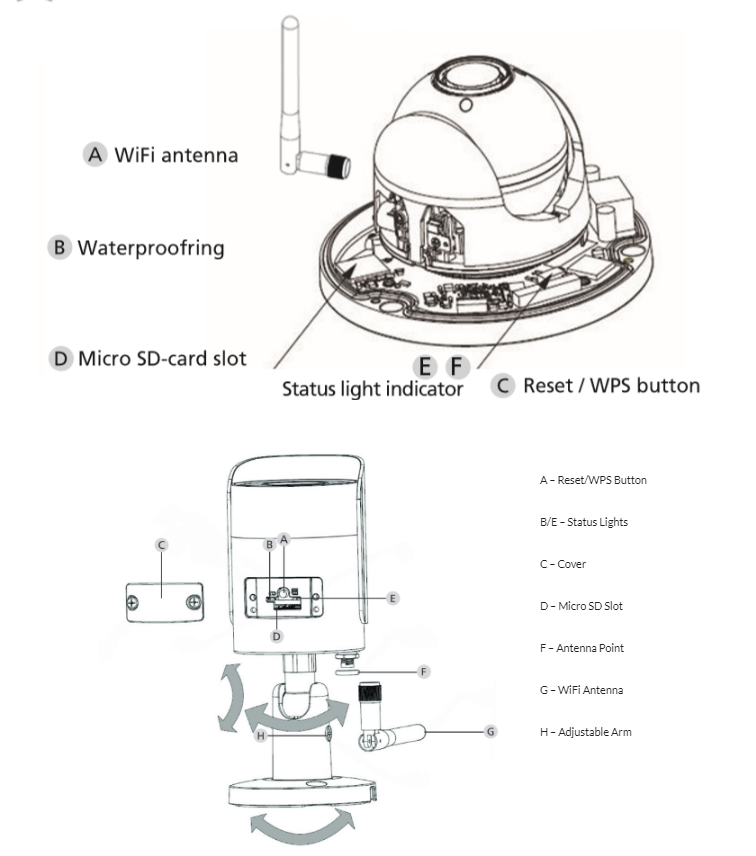
- To reset a camera hold the reset/WPS button for 10 seconds.
- If you change a password on one of the cameras then ensure that you also change the password for this camera in any tool you are accessing it with. This includes the Burg IP tool and an NVR (clicking the edit icon on the camera registration screen).
- If you are using standalone cameras with no recorder (referred to as NVR in this booklet) please note they will require SD cards for storage as they do not built in storage.
- Configure any cameras before mounting.
Quick Start:
Step 1: Connect to network.
Step 2: P2P with App device.
Step 3: Choose recording and alert settings.
Step 4: Format SD card.
Step 5: Create App live views and alerts.
Step 6: Optional Advanced Settings.
There are three methods for connecting the camera to your WiFi initially, try them in order.
Connect with App
Connect with WPS
Connect with LAN and switch to WiFi
Connect with App
Ensure your Mobile device is connected to the WiFi you want the camera connected to.
Download BURGcam Pro App.
From the home screen select camera then follow the icons below.
Open the Device Manager screen, add a new device and select WiFi Configuration, next either scan the QR code by clicking the icon in image 5 or type in the serial number, name the camera and click next.
Now just input the WiFi password and connect, this connection will only work when your device is connected to the same WiFi so once complete move to the next section below to ‘Create a P2P connection’.
If this fails then move to Connect with WPS instead.


Connect with WPS
Connect using WPS
This connection may fail depending on your Wi-Fi router and security settings, if so then proceed to option 2 initially.NOTE: After connecting you must configure recording settings to choose motion detection or 24/7 recording.
- Insert SD card into slot shown in diagram above.
- Connect camera power supply. (Close proximity to router ideally).
- Activate WPS on the camera by holding the button for 2 seconds (green light will blink fast). Then activate WPS on the router.
 WPS Icon
 - Wait for the status light to go solid green indicating an network connection.
- Now move to the next section to connect your mobile device to the camera.
If this method also fails then move to Connect with LAN and switch to WiFi
Connect with LAN and switch to WiFi
Connect using LAN and switch to WiFi.
Video Tutorial: https://youtu.be/7vFou0BVAW8
- Insert SD card into slot shown in diagram above.
- Connect camera power supply.
- Connect a LAN cable between your camera and router.
- Connect your PC to the router either by LAN or WiFi.
- Open the BURG IP config tool. (installed from the disc or downloaded from HERE.
- In the tool you should see your camera, if not then click refresh (1). Try this a few times until your camera appears as it may still be booting up.

- Note: If your camera still does not appear then please refer to the troubleshooting section as you may have a static IP then come back to this point.
- Click the internet icon next to your camera to open the browser window (5). Note: if your default browser is edge or chrome then you may not get full functionality. Please refer to the troubleshooting guide to change this.
- In the browser window enter your username (admin) and password (9999). It will ask you to set a new password, if you do then this will need to be entered every time you connect with a new device by P2P – covered later.
- Now go to Setting > Network > WIFI > WIFI
- Tick enable then refresh
- Select your WiFi router (double click) and enter the password.

- You can now remove the LAN cable from the camera.
Now create a connection between your mobile device and the camera below.
Create P2P Connection from BURGcam App to Camera.
- If you connected the camera initially with the app then first you need to delete the camera from your app, go to device manager select the camera and press the bin icon. This is to create a P2P connection now instead which will allow connection remotely.
- Download the BURGCam app from the app store on your iPhone or Android device.
- Open the BURGCam app and open the side menu select ‘Device Manager’.
- Click ‘Add Device’.
- Select ‘P2P’.
- Type a name for the device.
- Click the QR code icon and scan the devices QR code on the bottom of the dome model or side of the bullet. Or manually enter the device serial number. These are found under the dome or on the side of the bullet.
- Default username and password are correct if they have not yet been changed manually.
User name: admin
Password: 9999
- Click ‘Start Live Preview.’


Camera Set Up
Your camera is now connected to the network so it can be configured. Open Device Manager in the app and select to edit to camera settings as below.
Camera Set Up
Your camera is now connected to the network so it can be configured. Connect to your camera:BURG IP Tool: Open the IP config tool which is installed from the disc in the camera package or download it here. Any networked devices will show on the tool. If they do not then refresh. From the tool click the internet icon to connect to the camera, ensure your default web browser is internet explorer to view the live feed, steps to do this are here.
You can also edit some basic time and date settings in this tool as shown here.
Web browser: Enter the camera IP address into internet explorer to connect direct the camera will be given an IP by the router so either logging into the router or using an IP scanner will show the IP. On an IP scanner cameras will show as Santec devices.
Format SD Card
- Go to Storage > Destination
- Select Local from the top tabs.
- Here it may say error, if so click format on the right hand side.
- It will take a few minutes to format and reset.
- Once complete the camera will reboot, log back in and check the card is reading okay.

Recording Settings:
Now you must decide on your preferred recording settings, motion detection, always recording or only recording when requested.
Note: You can record 24/7 (general) but also have motion detection and alarms active to give app alerts.
An overall recording/motion/analytics guide can be viewed here.
Recording Modes
- Go to storage > Schedule
- Set your preferred recording choices.
- Click to settings wheel to change between:
- General: Record for the whole period General is set.
- Motion: Record only when motion is detected for the periods set.
- Alarm: Record only on alarms for periods set.

Motion Detection
- Go to Setup > Event > Video Detection:
- Click enable.
- Click setup next to working period and set a working period for motion detection or select all when in that screen.
- Anti-Dither this is the time allowed after motion stops before more motion is classified as a new event. Within this time frame will be one event.
- Area setup can set the camera to only look for motion is certain parts of its viewing angle but will record the whole screen. The area marked with the lines is that which will be considered for motion detection. Unmarked area will not trigger.
- Record delay –Amount of time a recording will continue after motion.
- Send email and snapshot set the camera to alert the user when events are detected (see next section to configure email).
- SAVE.

- Now go to Storage > Schedule.
- If you want to record on motion only then here ensure the timeline shows motion detection. Clicking the settings wheel will allow you to change between the recording modes. General (always recording), Motion, Alarm, IVS or manual (when you press record only).
- Check Storage > Destination and check this is set to Local if you are using an SD card or whatever your choice of storage is.
Set up App Live View and Alerts
- Open the Live Preview in the app.
- Click the + icon on each window in the preview to add a camera.
- Select the camera and ‘channel’ from the list. (The channel refers to the camera on board channel, in this case always 1).
- Once set click the star icon to save as a favourite view.
- The icon highlighted in the third image below will open the last view when you close and reopen the app to save time.


- Set up alerts in Alarm Manager > Push Config.
- Select camera and enable.
- Next in the menu choose motion detection or any other alerts you want and then the camera again.
- Go back once then click the save icon at the top of the screen.
Advanced Settings:
Setup:
Camera > Conditions:
Conditions tab, here you can change:
- Standard display settings including brightness and contract
- Day & Night settings:
- Auto, always black & white or colour.
- Sensitivity to light changes.
- Delay to prevent change to night if sensor is only covered temporarily.
- BLC Mode, if looking into a bright zone BLC settings allow a clear image still.
- Mirror, flip the view horizontally.
- Flip, flips the view vertically if the camera is upside down.
- 3DNR, reduces interference if in a signal hot zone.
Profile Management tab, allows multiple profiles to be created and scheduled to activate at certain times to give the best image quality at each time.
Camera > Video Settings:
Video tab, set encoding and resolution for main and sub stream.
Snapshot tab, change settings on image snapshot quality.
Overlay tab,
- Privacy masking covers an area from the camera if privacy is required.
- Titles can change overlay view on live and playback streams.
Path tab, Select where files are saved when recording or downloading from the web browser.
Network > TCP IP Settings:
TCP/IP tab:
- Hostname, change name of the camera on network.
- Ethernet card, set o wire or wireless to suit your needs.
- Mode, change to set static IP if required.
P2P tab
- Gives any information on pairing if required and contains QR code if camera is out of reach.
Network >SMTP Settings
- Set up email alerts as detailed in the video here
Network > UPnP
- Universal plug n play, if enabled this will allow access for any additional networks to view the device feed and recorded data – Not recommended
Network > WiFi
- As detailed in quick start this can be used as an alternative way to set up the camera
Event > Video Detect
Motion Detect tab ,for setting up motion detection as covered earlier.
Video Tamper tab,
- Enable, alerts via app and NVR (If used) if tampering is detected.
- Working period, set this active only at certain times or all the time if required.
Event > Abnormality:
SD Card tab,
- Set alerts via app and email for SD card removed, SD card error or full SD card.
Network tab,
- Enable alerts for network disconnection or IP address conflict.
Illegal Access tab,
- Set alerts when somebody fails log in a set number of times.
Storage > Schedule
- Schedule recording and snapshots for certain times of the day.
Storage > Destination
Path tab,
- Select where event triggers are recorded to.
Storage > Record Control
- Pack duration – length of recording upon motion or event detection
- Pre-event Record – time to record prior to event detection
- Disk full – Overwrite or stop recording when memory is full
- Record Mode – automatic on events or schedule or only manual
- Record Stream – Set to record from main live stream or sub stream to save memory.
- Select where files are saved when recording or downloading from the web browser.